ONNX.js 运行机器学习模型
# ONNX
ONNX是一种针对机器学习所设计的开放式的文件格式,用于存储训练好的模型。它使得不同的人工智能框架(如 Pytorch、 MXNet )可以采用相同格式存储模型数据并交互。
ONNX 的规范及代码主要由微软,亚马逊,Facebook 和 IBM 等公司共同开发,以开放源代码的方式托管在 Github 上。目前官方支持加载 ONNX 模型并进行推理的深度学习框架有: Caffe2, PyTorch, MXNet,ML.NET,TensorRT 和 Microsoft CNTK,并且 TensorFlow 也非官方的支持ONNX。 --- 来自维基百科
ONNX,即 Open Neural Network Exchange(开放式神经网络交换),是一个用于表示机器学习模型的标准,可使模型在不同框架之间进行转移,Caffe2、PyTorch、Microsoft Cognitive Toolkit、Apache MXNet等主流框架都对ONNX有着不同程度的支持,这就便于了我们的算法及模型在不同的框架之间的迁移。
ONNX 项目地址:https://github.com/onnx/onnx
ONNX 官方地址:https://onnx.ai
ONNX.js
ONNX.js 是一个 Javascript 库,用于在浏览器和 Node.js 上运行 ONNX 模型。
ONNX.js 只能运行预训练的模型,无法对模型进行训练。
借助 ONNX .js,Web 开发人员可以直接在浏览器上使用预训练的 ONNX 模型进行推测运算,减少服务器与客户端通信、保护用户隐私,提供免安装和跨平台浏览器的 ML 体验。
ONNX.js 使用 WebAssembly 和 WebGL 技术使模型推论运行在CPU和GPU上,利用Web Workers提供的多线程环境实现并行的数据处理,达到近乎本机的执行速度。
PC端兼容的浏览器:
移动端兼容的浏览器:
ONNX.js 项目地址:https://github.com/Microsoft/onnxjs
ONNX.js 在线示例:https://microsoft.github.io/onnxjs-demo
实践
ONNX.js 为 Script、NPM、Node.js 都有提供SDK,详细的集成文档详见:https://github.com/Microsoft/onnxjs
下面将以NPM方式使用 Vue CLI 创建一个空项目,用一个已经训练好的图像分类模型,实现图像分类推理的例子来演示如何集成与使用ONNX.js。
通过这个例子,将会掌握:
安装 ONNX.js 库
创建 InferenceSession (推理会话)
加载 onnx 模型
使用一张图片作为模型训练的 Input 参数
运行模型进行推理
获取模型运行的结果
1. 创建空项目
为了方便,这里我们使用 Vue CLI 创建一个 TypeScript 的空项目,并修改 src/App.vue 文件中的内容为如下代码:
<template>
  <div id="app">
    TODO
  </div>
</template>

<script lang="ts">
import { Component, Vue } from 'vue-property-decorator'

@Component
export default class App extends Vue {}
</script>如何创建项目工程可参考这篇文章:使用VueCLI快速搭建TS+Vue工程
启动项目:
npm run serve2. 安装 ONNX.js
执行命令安装 onnxjs 库:
npm install onnxjs当前安装的onnxjs版本为:0.1.8
其他依赖库:
npm install ndarray
npm install ndarray-ops
提示:如果在页面中无法引入 ndarray 和 ndarray-ops,请在src/shims-vue.d.ts文件末尾追加内容:
declare module '*'3. 准备工作
onnx 模型文件(一个简易图像分类模型),约97MB,地址:
https://github.com/microsoft/onnxjs-demo/blob/data/data/examples/models/resnet50_8.onnx将模型文件下载后保存到public目录下,并重命名为:resnet50_8.onnx
模型结果集(分类标签),地址:
https://github.com/microsoft/onnxjs/blob/master/examples/browser/common/imagenet.js创建 src/imagenet.ts,将模型结果集文件中的内容复制到文件中,内容结构如下:
export const imagenetClasses = {
  '0': ['n01440764', 'tench'],
  ...
}
一张进行分类推理的图片,地址(可以是任意图):
https://raw.githubusercontent.com/microsoft/onnxjs/master/examples/browser/resnet50/resnet-cat.jpg将图片下载下来保存到public目录下,并重命名为:cat.jpg
4. 构建页面
①. 定义 state & 添加一个按钮点击回调函数
<template>
  <div id="app">
    <div>
      <img id="img" src="/cat.jpg" :width="imgSize" :height="imgSize" />
    </div>
    <Button @click="onPredict" :disabled="isRunning || !isLoadModel">预测</Button>
    <div v-html="text"></div>
  </div>
</template>

<script lang="ts">
import { Component, Vue } from 'vue-property-decorator'
import { IMAGENET_CLASSES } from './imagenet'

@Component
export default class App extends Vue {
  // 图片尺寸,reset50模型限制
  imgSize = 224
  // 预测会话
  session = new InferenceSession()
  // 模型是否已加载
  isLoadModel = false
  // 正在预测
  isRunning = false
  // 结果
  text = ''

  onPredict () {
    if (!this.isLoadModel) {
      alert('模型加载失败,无法预测')
      return
    } else if (this.isRunning) {
      alert('当前正在预测中')
      return
    }
    this.predict()
  }
}
</script>
5. 使用ONNX.js
①. 引入 onnxjs 以及依赖库
import { Tensor, InferenceSession } from 'onnxjs'
import ndarray from 'ndarray'
import ops from 'ndarray-ops'
②. 加载onnx模型文件
mounted () {
  this.text = '正在加载模型文件...'
  const modelUrl = '/resnet50_8.onnx'
  // 加载模型到session中
  this.session.loadModel(modelUrl)
      .then(() => {
        this.isLoadModel = true
        this.text = '模型加载成功'
      })
      .catch(e => {
        console.error(e)
        this.text = '模型加载失败:' + e.message
      })
}
③. 组装运行模型需要的参数(Input)
/**
 * 数据预处理
 */
preprocess (): Tensor {
  // 获取出图片的数据
  const canvas = document.createElement('canvas')
  const context: any = canvas.getContext('2d')
  const img: any = document.getElementById('img')
  canvas.width = img.width;
  canvas.height = img.height;
  context.drawImage(img, 0, 0 );
  const imageData = context.getImageData(0, 0, img.width, img.height)
  const { data, width, height } = imageData
  // 数据及参数配置
  const dataFromImage = ndarray(new Float32Array(data), [width, height, 4]);
  const dataProcessed = ndarray(new Float32Array(width * height * 3), [1, 3, height, width]);
  // 归一化 Normalize 0-255 to (-1)-1
  ops.divseq(dataFromImage, 128.0);
  ops.subseq(dataFromImage, 1.0);
  // 补位 Realign imageData from [224*224*4] to the correct dimension [1*3*224*224].
  ops.assign(dataProcessed.pick(0, 0, null, null), dataFromImage.pick(null, null, 2))
  ops.assign(dataProcessed.pick(0, 1, null, null), dataFromImage.pick(null, null, 1))
  ops.assign(dataProcessed.pick(0, 2, null, null), dataFromImage.pick(null, null, 0))
  // 创建张量
  const tensor: Tensor = new Tensor(new Float32Array(3 * width * height), 'float32', [1, 3, width, height]);
  (tensor.data as Float32Array).set(dataProcessed.data)
  return tensor
}
④. 解析并展示模型运行结果(Output)
/**
 * 输出结果
 */
printResult (outputMap: InferenceSession.OutputType) {
  // 结果集
  const data: ArrayLike<number> = outputMap.values().next().value.data
  if (!data || data.length === 0) {
    this.text = '没有预测出结果'
    return
  }
  // 转换成二维:[几率, 分类索引]
  const probsIndices = Array.from(data).map((prob, index) => { return [prob, index] })
  // 按几率对结果进行排序
  const sorted = probsIndices.sort(
      (a: Array<number>, b: Array<number>) => {
        if (a[0] < b[0]) {
          return -1
        }
        if (a[0] > b[0]) {
          return 1
        }
        return 0
      }
  ).reverse()
  // 取出前5个结果
  const results: Array<string> = []
  sorted.slice(0, 5).forEach((probIndex: any) => {
    // 取出索引
    const index = parseInt(probIndex[1], 10)
    // 根据索引取出对应的分类标签
    const iClass = (IMAGENET_CLASSES as any)[index]
    const name = iClass[1].replace(/_/g, ' ')
    const probability = probIndex[0]
    results.push(`${name}: ${Math.round(100 * probability)}%`)
  })
  this.text = results.join('<br/>')
}
⑤. 运行模型进行推理
/**
 * 预测
 */
predict () {
  this.isRunning = true
  this.text = '正在预测...'
  // 预处理数据
  const preprocessedData = this.preprocess()
  // 预测
  this.session.run([preprocessedData])
      .then((outputMap: ReadonlyMap<string, Tensor>) => this.printResult(outputMap))
      .catch(e => this.text = '预测失败:' + e.message)
      .finally(() => this.isRunning = false)
}
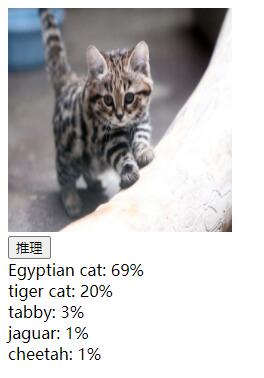
6. 运行结果

推理结果
模型
ONNX 模型
ONNX.js 支持所有 onnx 模型,当前支持的机器学习模型范畴:
视觉
图像分类
对象检测和图像分割
身体、面部和手势分析
图像操作
语言
机器理解
机器翻译
语言建模
其他
视觉问题回答和对话
语言和音频处理
ONNX 模型库:https://github.com/onnx/models
其他框架的模型
正如前面概述中所说,ONNX 是机器学习模型的标准范式,目前像 TensorFlow、Caffe2、PyTorch 等主流框架都对 ONNX 有所支持,我们可以将其他框架的模型转换为 ONNX 模型。
不同框架模型转 ONNX 模型工具及示例:
更多转换示例,见:https://github.com/onnx/tutorials
最后
优
将模型的运算放在了客户端,减少客户端与服务器的通信,提升用户体验,同时极大服务器运行成本。
使用 ONNX 模型,可以将其他框架的模型转为ONNX,扩大模型选择的范围,降低了模型迁移成本。
使用 WebAssembly 和 WebGL 技术使模型可以高效的在本机 CPU 和 GPU 上运行。
劣
仅支持运行预先训练好的模型,无法进行模型训练。
InferenceSession 提供的 loadModel 加载模型文件函数,没有使用分片下载,受限客户端网络环境。
ONNX.js 社区似乎不够活跃。
ONNX.js 库使用简单、容易上手,对于一些已有预训练模型,只需要在客户端使用模型的需求场景,ONNX.js 是很好的解决方案。但 ONNX.js 无法在浏览器端进行模型的训练。
链接
ONNX.js 示例代码:https://github.com/microsoft/onnxjs-demo
ONNX.js API 文档:https://github.com/microsoft/onnxjs/blob/master/docs/api.md
ONNX 模型转换:https://github.com/onnx/tutorials